Wednesday, March 4, 2020

TDI 4Runner Conversion is For Sale!

After much consideration, I have decided to sell my TDI 4Runner diesel conversion. My current priorities are focused on growing my business and other entrepreneurial opportunities. 

This truck is a 1990 4wd 4Runner with a manual transmission. It originally came with a V6 engine. I bought the truck with a bad engine and started this conversion project from there. 

After the conversion was complete, I drove the truck as my daily driver for 11,000+ miles. There were no major issues at all, just some small tweaks and adjustments as you'd expect with such a major project. It gets roughly 28mpg on the highway, but I suspect it could do even better with a bit more tuning.

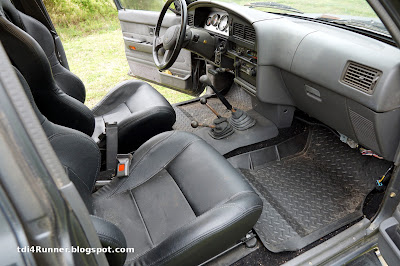
MODS: The conversion entailed a Volkswagen ALH 1.9 TDI engine, custom wiring harness, Malone tune, custom fuel system, custom 3" mandrel-bent exhaust, custom intake system with STI intercooler and mandrel-bent piping, custom intake manifold, hand-built custom exhaust manifold. GTB1756vk turbo, new front suspension parts (ball joints, tie rods, axles, brakes, etc, etc), custom gauges, new carpet, new front seats (now showing some wear), custom-made seat brackets, Spartan locker, twin-stick transfer case shifter conversion, Warn manual front hubs, 33x10.50 AT tires, and more!

For the full list of mods, see this spreadsheet on Google Drive. Most prices I paid are listed, but not all. I have receipts for most things I bought for this project. The spreadsheet does not include labor for this project, which I did not track. 

WORK NEEDED: This truck has been sitting for 2 years due to no garage to work in and life changes. It does need some minor work to be roadworthy again. There is a small fuel leak from somewhere in the fuel tank area. There is a small amp draw, so if it sits more than 8-10 days you'll have to charge the battery. I have an idea of where to find the amp draw, but no time to investigate right now. Other minor concerns are getting the windshield washers working, new wiper blades, fixing reverse lights, etc. The truck still has a gasoline title, so it will not pass NC inspection for that. This is not a big deal - just get a DMV officer to inspect and change the title. Some states and/or counties don't even require an inspection. Let's be honest here, the truck is not pretty. The clear coat is all but gone, there a few rust spots, and the bumpers are in poor condition. I've probably missed a few points, but these are the main ones.

TERMS: This truck is for sale AS-IS WHERE-IS and is located near Charlotte, NC. The NC title is in hand. I offer no warranties of any kind. If you are unable to pick up, we can discuss delivery or shipping options, at your expense. The truck will not leave my property until paid in full and funds have cleared the bank. Cash is preferred.  

PRICE: Review the build log on this blog and make a reasonable offer. What is it worth to you? Let's talk. Email me.

Quick about me: I have been a hands-on person all my life. My automotive and metal fabrication journey started in college. My roommate and I built a 4cyl turbo Mustang and experimented with various turbos, exhausts, head porting, tunes, etc. That project ended when I have a giant Turbonetics turbo that was too much for the engine. :) After college, I attended NASCAR Technical Institute in Mooresville, NC. I learned so much about all aspects of vehicles plus a deep dive into metal fabrication. After NTI, I was an automotive technician at a Memphis Volkswagen dealership and then an independent shop. Shortly after I moved back to NC, I started the 4Runner project. I now own and operate a bicycle retail store in NC. Bicycles have been a part of my life since childhood and now I earn a living doing that. :)


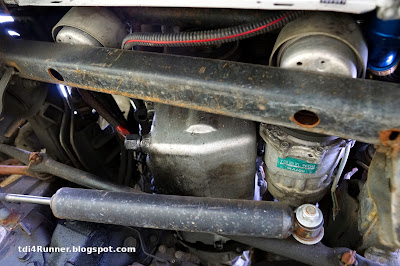




Cooling System Notes & Pics

I used an aluminum circle track radiator and modified it to work. A few years after the below version was installed, a driver ran a red light and damaged my radiator. I bought the same radiator but welded -12AN fittings to it for easier use (not pictured below).


Radiator inlet box to move hose above power steering gear box.

Inlet transfer box welded onto the side tank.

These radiator mounts are designed to bolt to the frame. Radiator is isolated in the cups by rubber. Radiator is very solid in the vehicle.

Radiator did not come with a provision for a drain valve. I fixed that :)


I turned the heater core outlet 90 degrees so that I would have room to install a fitting and hose without hitting the firewall. Works great.

Monday, January 13, 2014

TDI 4Runner Video Part 13 - Early ALH Glow Plug Relay Wiring


Relay pin 30 - This is the largest terminal on the relay, and is wider than your normal sized spade connector. This is a fused 50a circuit from battery positive. I finally found the wide spade connectors at Northern Tool.

Relay pin G1/2 - Switched power wire to glow plugs 1 & 2. Self explanatory.

Relay pin G1/2 - Switched power wire to glow plugs 3 & 4. Self explanatory.

Relay pin 31 - Control side ground.

Relay pin 86 - Control side positive. This is powered by the ECM relay (yellow wire in my case).

Relay pin ST - ECM to relay. ECM uses this wire to activate the relay when specified conditions are met where the glow plugs are to be on. 5v signal. White/purple wire. ECM pin T80/42.

Relay pin D1 - 5v signal back to ECM when ST pin is powered. This circuit provides feedback to the ECM that includes fault checking. Green wire. ECM pin T80/37.

With this configuration, the glow plugs worked perfectly the first time I tried it. With the ECT sensor unplugged, my ammeter read 49 amps on relay pin 30 with the key on. After the engine starts, the amp draw went down to 24 to 25 amps. Only glow plug fault remaining is for an open circuit to the GP light, which I have not yet wired.

This wiring information is for the Bosch OEM relay, part #038 911 253. Use the above information at your own risk. The data I posted above is correct for my application, may not be accurate for your application. Double check & triple check your wiring diagrams. Figure out & understand exactly what each wire does. Do your own research. Learn how things work. Write notes so you don't forget. If you screw this up and damage something, it is entirely your fault!

Tuesday, December 24, 2013

TDI 4Runner Video Part 12 - AutoMeter Fuel Gauge Universal Sender


I used an AutoMeter Phantom 2 1/16th fuel gauge. As I expected, it was not compatible with the factory fuel level sender. I cut a new hole in the tank at a better location and installed AutoMeter's universal fuel level sender. I was able to get a nice full float sweep from the bottom to the top of the tank. So far it works great.

Sunday, November 17, 2013

TDI 4Runner Gauges

On past project vehicles, I have always wanted all aftermarket gauges, but never did due to cost. Early on I decided it was going to happen on this 4Runner. There's 8 gauges - oil pressure, pyrometer, boost, volts, RPM, speed, coolant temp, and fuel level. All are AutoMeter except for the Speedhut GPS 0-100 speedometer. I decided to go with Speedhut because they offered what I wanted at a much more affordable price than Autometer. It doesn't match the other gauges perfectly, but it's close enough for me. I'm happy with it. I also added transistor-controlled LEDs for the glow plug and MIL lights, and 2 LEDs for turn signal indicators.

I knew it would be some work to install all these gauges, but I really under estimated it. No idea how many hours I have in the whole setup, but there was a lot of time consumed in making it all look nice, wiring up the lights, powers, grounds, and sensor wires. It was worth it, though; the end result is exactly what I wanted.

Thanks to Alchemist from the TDIClub forums for schematic and Jimbote for bringing it to my attention that I'd need to build this circuit.
Yes, there's heat shrink tubing on each individual wire to keep them from touching each other. The large piece of heat shrink tubing on the outside is to keep the unit stationary and add structural strength.